Adding websites to Kodi is a great way to access content that would otherwise be unavailable. By adding websites as “add-ons”, you can stream videos, music, and other media right from your Kodi device.
Kodi may be used to watching TV, but it may also be so much more. Because there are so many add-ons for the platform, you can watch almost everything with Kodi, listen to music, play some basic games, and even surf the internet. That is what I’m going to discuss today.
Although not as simple to use as surfing on your smartphone or PC, accessing the internet directly from your Kodi box might be beneficial. You may check out IMDB right away for movie or TV show information, find out who an actor is and where you’ve seen them previously, or just surf from your television. For those who are considering getting a media streaming device, you might be interested in comparing Kodi vs Firestick to see which one is the better option for you.
In this blog post, we will walk you through the process of adding a website to Kodi. We will also provide a list of some of our favorite websites to add!
Why Do You Need to Add Your Website to Kodi?
If you’re a Kodi user, then you know that one of the best things about the media player is its vast library of add-ons. Add-ons allow you to customize Kodi to suit your needs, and there are all sorts of different ones available. But what if you want to add your own website to Kodi?
The majority of Kodi’s add-ons come from third parties. There is an internal security setting in Kodi that prohibits you from installing such add-ons. In order to install your favorite add-ons on any device, you must first modify the setting.
Before we get started, it’s worth noting that adding a website to Kodi is different from installing a web browser add-on like Chrome or Firefox. With those add-ons, you can browse the internet within Kodi itself. When you add a website to Kodi, however, you’re simply creating a shortcut to that site so that you can access it more easily.
Use Web Viewer to Browse Web on Kodi
The Kodi Web Viewer is a linear text web browser that does not render pages but rather filters and displays content in the order it was found in the original HTML. It may be used to implement simple text activities on websites, such as Real-Debrid authorization or All-Debrid authorization, which are both examples of real-time interactivity. In addition, the Web Viewer can be used to create custom wallpapers for Kodi from an image URL.
The first thing you need to do is install the Web Viewer add-on. You can find this in the official Kodi repository. Once you have installed the Web Viewer add-on, launch it and enter the URL of the website you want to browse in the text box that appears. Then press Enter on your keyboard. The website will now load in the Web Viewer window and you can browse it as normal. If you want more information about Kodi and its add-ons, you can check out KodiProfi.de German blog that covers all things Kodi.
How to Get a Web Browser on Kodi (Chrome Launcher)?
The Chrome Launcher is a program that allows you to access everything that the Google Chrome browser on your device supports. You can use it to check out all of what the Google Chrome browser on your Android device has to offer.
What else does the Chrome Launcher have to offer? It may also assist with creating shortcuts for your favorite websites, saving time by not having to type in the complex web addresses on the remote control every time.
To use the Chrome Launcher:
- You’ll first need to download and install it from the Google Play Store;
- Once it’s installed, open it up and agree to the terms and conditions. After that, you should see a list of all of the apps that are installed on your Android device;
- Find and select Kodi from this list. If you don’t see Kodi listed, simply type in “Kodi” into the search bar at the top of the screen;
- Once you have Kodi selected, scroll down until you find the “Add-ons” tab. Select this tab and then select “Download”;
- From here, scroll down until you find the “Chrome Launcher” add-on. Select it and then click on “Install”;
- Once the installation is complete, open up Kodi and go to the “Add-ons” tab once again. Select “Chrome Launcher” from the list of add-ons and then click on “Launch”;
- From here, you should be able to use all of the features that the Google Chrome browser offers;
How to Install Any Add-on on Kodi
Add the Source
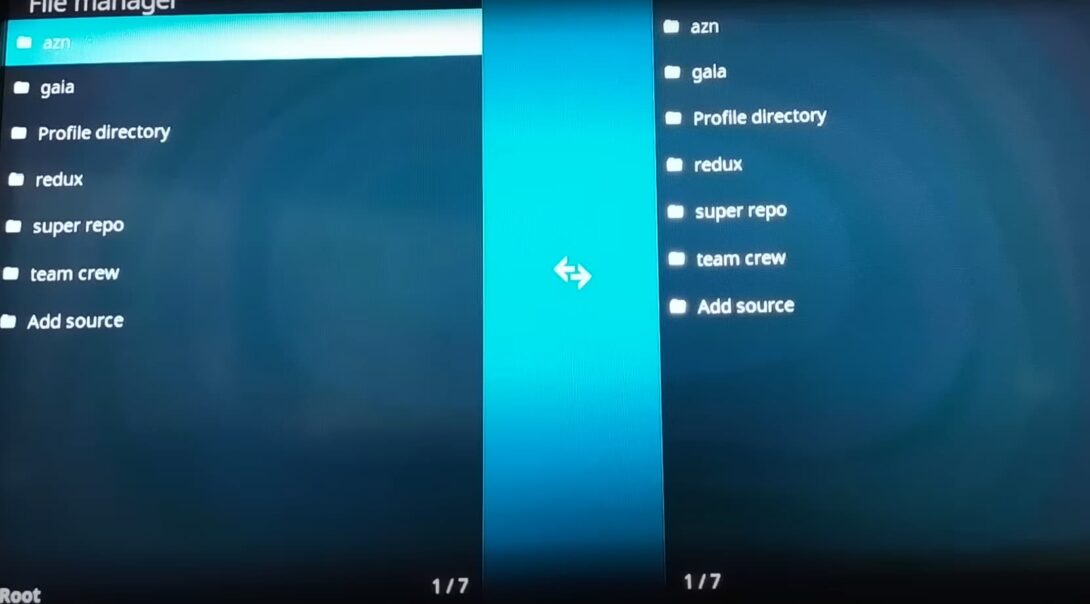
In order to add a website as a source on Kodi, you will need the web address of the site you wish to add. This is typically in the form of an URL and can be found in the site’s settings or preferences. Once you have this web address, open Kodi and go to “Settings -> File Manager”. Here, you will see a list of sources that are already added to Kodi. Select “Add Source” at the bottom of this list.
You will now be presented with a dialogue box asking for the path of the source. Enter the web address of the site you wish to add here, then select “OK”. Give your new source a name (this can be anything) and then select “OK” again. Your source will now be added to Kodi.
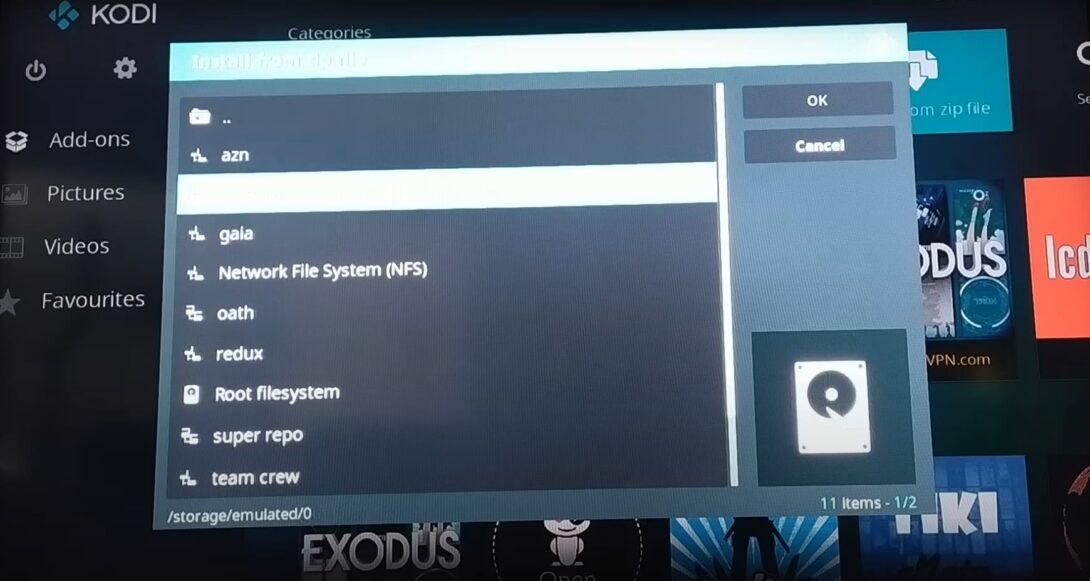
Now that your source has been added, you can install any add-on from it that you like. To do this, go to “Settings -> Addons” and select “Install from Zip File”. A dialogue box will open asking you to select the source you wish to install from. Select the source you just added, then select the add-on you wish to install. The add-on will now be installed on Kodi!
Install the Repository
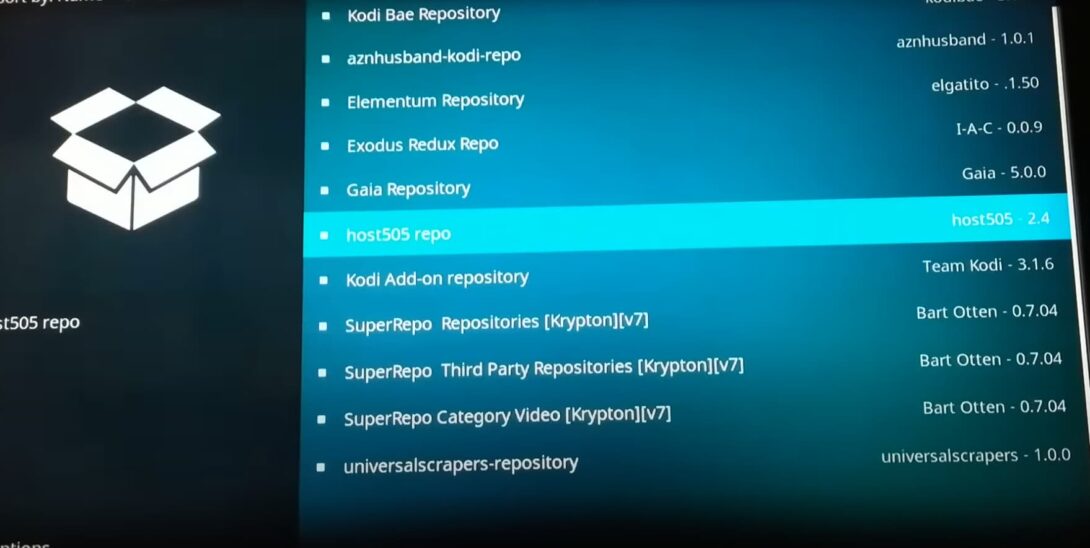
Or you may use the repository. A repository is a collection of add-ons that can be installed on Kodi. To install a repository, go to “Settings -> Addons” and select “Install from Repository”. You will now see a list of all the repositories that are available on Kodi. Select the one you wish to install, then select the add-on you wish to install. The add-on will now be installed on Kodi!
That’s it! You’ve now successfully added a website as a source on Kodi. You can now install any add-on from that site that you like. And remember, if you ever have any problems with an add-on or repository, always contact the developer first before doing anything else. They will be able to help you resolve your issue much faster than anyone else!
How to Browse the Internet with Kodi?
Kodi is a great way to browse the internet and keep up with your favorite websites. Here’s how to add a website to Kodi:
- First, open Kodi and go to the main menu. From there, select “Settings”. Under “Settings” select “System Settings”. Then, select “Add-ons”;
- Look for an add-on called “Web Browser” and install it. Once it’s installed, go back to the main menu and select “Add-ons”. You should see the Web Browser icon under “Program Add-ons”;
- Now, launch the Web Browser add-on. When it opens, you’ll be prompted to enter a URL. Enter the address of the website you want to add and press “OK”;
- The website will now be added to Kodi and you can access it anytime by going to the main menu and selecting “Add-ons”;
FAQ
How do I add streaming sites to Kodi?
Using a laptop or desktop operating system to view movies is not ideal. Using a Kodi distribution such as LibreElec or OSMC is a better choice.
Many add-ons may be installed on Kodi in order to access your favorite streaming service (Prime Video, Netflix, YouTube, etc.).
But what if there is no add-on available for the specific service you want to use? You can still access these streaming services by adding their website as a source in Kodi.
Here are the steps:
- First, open up Kodi and head to the settings cog in the top left corner. Then, go to “System settings”. Select the “Add-ons” tab from the menu on the left. Enable unknown sources if it isn’t already (this allows you to install add-ons from unofficial sources). A warning message will pop up; just select “Yes”;
- Now that “Unknown Sources” is enabled, go back to the main “System Settings” page and select “File manager”;
- From here, select “Add source”;
- You’ll see a box that says “” in it. Click on this, and you’ll be prompted to enter the path of the source you’re adding;
- For a website, the path will be the web address (URL) of the site. So, for example, if you wanted to add Netflix as a source, you would enter “url=netflix.com”;
- You can name your source anything you want; this is just so you can easily identify it later on. When you’re finished, select “OK”;
- Now that your source has been added, go back to the main Add-ons page and select “Install from zip file”. A list of sources will pop up; select the one you just added;
- You should now see a list of files on the website. Find the file you want to install and select it. In most cases, this will be a “.apk” file (Android app) or a “.exe” file (Windows program);
- The installation process will now begin. Once it’s finished, you’ll be able to access the website through Kodi;
Keep in mind that not all websites will work with Kodi. Some sites may block access from Kodi IP addresses, and others simply don’t have a compatible format for viewing on a TV screen. You may also need to sign in to certain websites before you can start streaming content. However, if a site does work with Kodi, adding it as a source is a quick and easy way to get started.
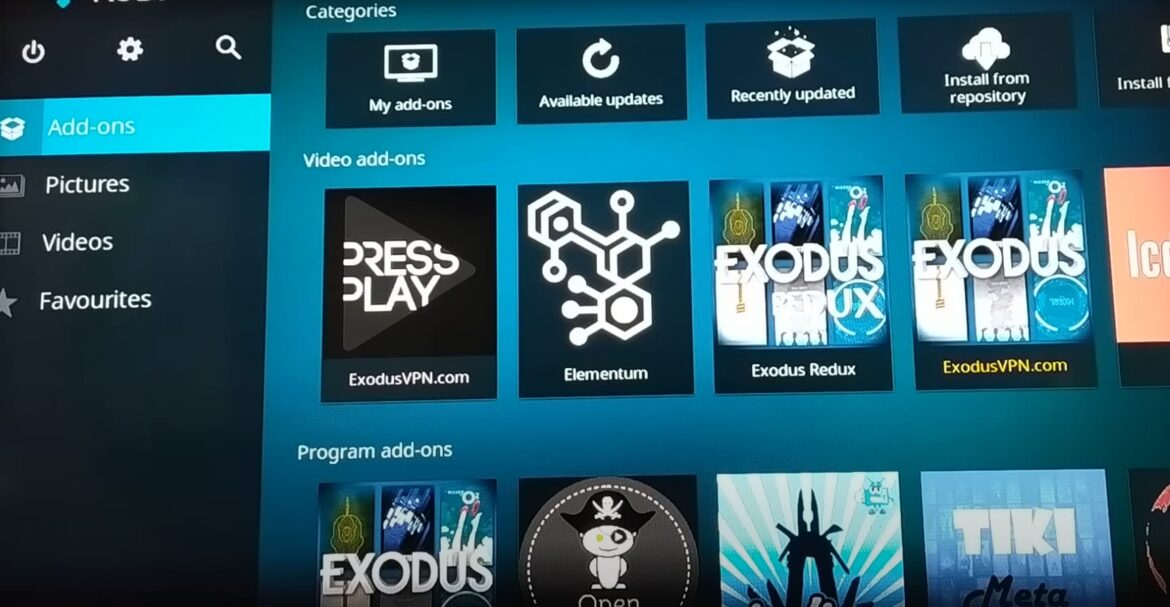
Where is the add-on browser in Kodi?
The add-on browser is located in the main menu under “Home”. Select “Add-ons” from the list of options. From here, you can browse through the various add-ons that are available.
To install an add-on, simply select it and click “Install”. Once the installation is complete, you will be able to access the add-on from the main menu.
Select “Add-ons” > “My Add-ons”. You should now see the add-on listed under the “Video Add-ons” section.
How do I add Google Drive to Kodi?
One of the great things about Kodi is that it’s highly customizable. You can add all sorts of different content sources, including websites.
Before we get started, there are a few things to keep in mind:
- First, not all websites will work with Kodi. Some sites use technologies that are incompatible with Kodi or require special authentication (like a login);
- Second, even if a website does work with Kodi, it may not be optimized for use on a big-screen TV. So don’t be surprised if some sites don’t look great when viewed through Kodi;
Synchronizing Google Drive with Kodi is a simple and versatile method to watch your films and TV shows. You may use a Kodi add-on to access all of your Google Drive videos, without the need for any external storage media. You can enjoy a buffer-free and pleasant streaming experience from anywhere there is an internet connection.
The steps below will show you how to set up the Google Drive add-on for Kodi:
- First, open up Kodi and click on the “Add-ons” tab in the main menu. Then, click on the icon that looks like an open box in the top-left corner of the screen. This will open up the “Add-on Browser” menu;
- Next, select the “Install from Repository” option. Find and click on the “Kodi Add-on Repository” option;
- Now, scroll down and select the “Video Add-ons” option. Find and click on the “Google Drive” add-on;
- Finally, click on the “Install” button to install the add-on. Once it’s installed, you’ll find it under the “Add-ons” tab in Kodi’s main menu;